


Yes, ceiling down light (ceiling-mounted downlights) can be disassembled and reinstalled after installation, but this depends on three key factors: the fixture’s installation structure (snap-on vs. screw-fixed), component durability (wear-resistant materials), and whether the ceiling hole is intact. Screw-fixed ceiling recessed downlight (e.g., old non-COB models) may face issues like stripped screw holes after disassembly, making reinstallation unstable. However, premium best led downlight like IMIGY’s Explorer Down Lights and Melody Down Lights (both COB models) feature reversible designs—snap-on brackets or reinforced screw ports—that allow repeated disassembly and reinstallation without damage. These fixtures also adapt to diverse scenarios, from residential led recessed downlight relocation to commercial maintenance. The following breaks down feasibility factors and our products’ advantages.

1. Key Factors for Reversible Disassembly & Reinstallation
a. Installation Structure
Snap-on design (preferred for reversibility): IMIGY’s Explorer Down Lights use spring-loaded metal brackets—press brackets inward to disassemble, then push to reinstall. No screws mean no stripped holes, enabling 5 +cycles without stability loss.
Screw-fixed design (requires care): Melody Down Lights (commercial models) use reinforced screw ports (brass inserts) that resist stripping. Unlike plastic screw ports in generic ceiling down light, they maintain grip after 3–4 disassembly cycles.
b. Component Durability
Housing materials: Aluminum alloy (used in both Explorer and Melody models) resists bending during disassembly, unlike plastic led recessed downlight that cracks easily.
Wire connectors: IMIGY’s push-in connectors (included) are reusable—unplug wires during disassembly, then reinsert during reinstallation. Cheap ceiling down light uses one-time twist-on connectors that break after disassembly.
2. IMIGY Products’ Reassembly Advantages
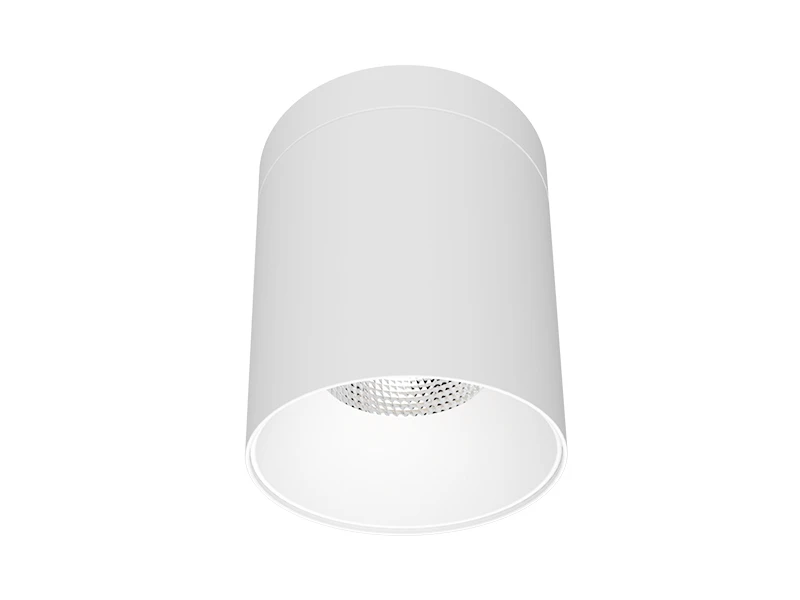
a. Explorer Down Lights (Residential-Grade ceiling down light)
Tool-Free Reversible Design: Spring-loaded snap-on brackets have no wear parts—disassemble by hand (no tools) and reinstall in 2 minutes. The brackets’ 75mm–100mm adjustable range fits existing ceiling holes, so no new drilling is needed after relocation.
Ceiling-Friendly: Smooth edge design avoids scratching gypsum board ceilings during disassembly/reinstallation—critical for residential spaces where ceiling damage is unwanted. The 0.8kg lightweight body reduces pressure on the ceiling hole, keeping it intact for repeated use.
Compatibility with Relocation: Ideal for homeowners moving the downlight (e.g., from the living room to the bedroom). It works as a direct replacement for old ceiling recessed downlight and pairs with cob led downlight replacement kits if components need updating.
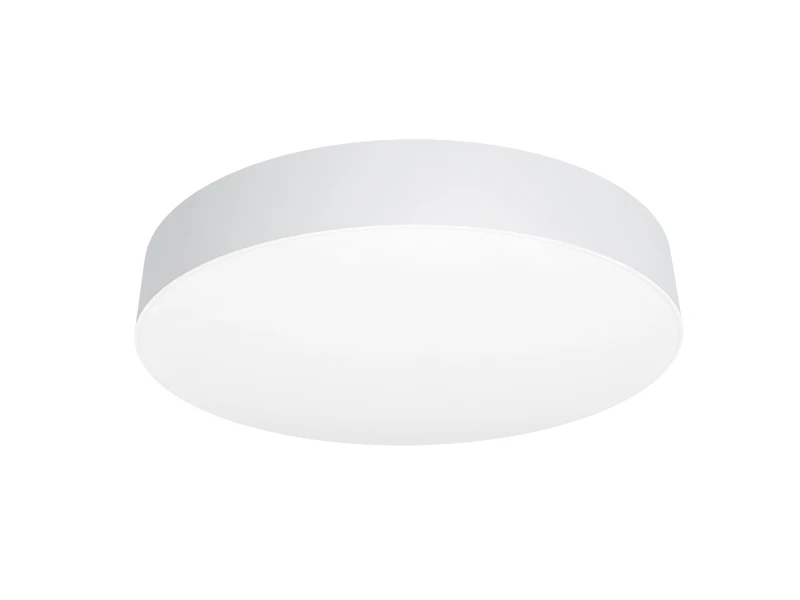
b. Melody Down Lights (Commercial-Grade ceiling down light)
Reinforced Screw Ports: Brass screw inserts in the aluminum housing prevent stripped holes—disassemble and reinstall 4–5 times without losing stability. Generic led recessed downlight uses plastic ports that strip after 1–2 cycles.
Dustproof & Waterproof Resilience: IP44 sealing (for commercial kitchens/retail) remains intact after disassembly—unlike cheap downlights where gaskets tear during removal. This ensures reinstalled lights still resist moisture and dust.
Maintenance-Friendly: Designed for commercial maintenance (e.g., bulb replacement in offices). Disassemble to access the COB chip (no soldering needed), then reinstall—no need to replace the entire fixture, reducing costs vs. non-reusable ceiling down light.
3. Practical Tips for Disassembly & Reinstallation
a. Disassembly Steps
Turn off power at the circuit breaker (safety first—never disassemble live ceiling down light).
For snap-on models (Explorer): Press bracket tabs inward, pull the light down, then unplug the push-in wire connector.
For screw-fixed models (Melody): Use a Phillips screwdriver to remove 2–3 screws, pull the light down, and disconnect wires.
b. Reinstallation Tips
Check the ceiling hole: Ensure it’s free of debris (use a vacuum if needed). For snap-on models, align brackets with the hole and push until it clicks.
Reuse original components: Use IMIGY’s reusable wire connectors—don’t replace them with one-time parts (common in generic cob led downlight replacement kits).
4. Mistakes to Avoid
Don’t Force Disassembly: For stuck snap-on brackets, use a plastic pry tool (included with IMIGY products)—never pull hard, which bends brackets (ruining stability).
Don’t Over-Tighten Screws: For Melody Down Lights, tighten screws until snug (10–15 N·m)—over-tightening strips brass ports, even in reinforced models.
Don’t Ignore Ceiling Damage: If the ceiling hole cracks during disassembly, use a small amount of gypsum filler before reinstallation—an unstable hole makes the downlight wobble.
ceiling down light can be safely disassembled and reinstalled with the right design, and IMIGY’s Explorer Down Lights (snap-on, tool-free) and Melody Down Lights (reinforced screw-fixed) excel in reversibility. These best led downlight options avoid common issues like stripped holes or broken components, enabling relocation, maintenance, or cob led downlight replacement without replacing the entire fixture. Whether you’re a homeowner moving a residential led recessed downlight or a business maintaining commercial ceiling recessed downlight, our products ensure stable, damage-free reinstallation. Contact us to choose the right reversible ceiling down light for your needs, and we’ll provide step-by-step guides for safe disassembly and reinstallation.
It is recommended that you upgrade the latest browser
 Edge
Edge


