


When creating the ideal indoor lighting environment, Install Track Lighting Ceiling is a flexible and practical approach, providing diverse lighting effects for the space. Whether it's highlighting product displays in commercial venues or creating a unique atmosphere in home environments, track lights play a vital role. Polaris Track Lights and Flame Track Lights from IMIGY Lighting, as high - quality Dimmable Track Lights products, not only offer excellent lighting performance but also feature a convenient installation process. The following will provide you with a detailed step - by - step guide and tool list for Install Track Lighting Ceiling, helping you complete the installation with ease and experience the unique charm of track lights.
1. Necessary Tools for Installation
a. Basic Hand Tools
You will need a screwdriver set, including both flat - head and Phillips - head screwdrivers. These are essential for fastening and loosening screws during the installation of Dimmable LED Track Light fixtures like Polaris Track Lights and Flame Track Lights. A drill with appropriate drill bits is also required. It helps create holes in the ceiling for mounting the track, ensuring a secure installation.
b. Electrical Tools
An electrical tester is crucial to ensure safety. Before starting the installation, use it to check that there is no electricity flowing in the circuit, preventing electric shock accidents. Additionally, wire strippers are needed to remove the insulation from the wires, enabling proper electrical connections for your Lampu Track Light system.
2. Step - by - Step Installation Guide
a. Plan the Layout
Before installation, carefully plan the layout of your Dimmable Track Lights. Decide where you want to install the track on the ceiling according to your lighting needs. For example, in a living room, if you want to use Flame Track Lights as the main lighting source, install the track in the center of the ceiling. In a commercial store, use Polaris Track Lights along the display areas to highlight products. Mark the positions on the ceiling with a pencil.
b. Mount the Track
First, turn off the power supply to the relevant circuit at the breaker box. Then, attach the mounting brackets to the ceiling using the drill and screws. Place the track on the brackets and secure it firmly. Make sure the track is level to ensure the Dimmable Downlight LED fixtures, when installed later, will illuminate evenly.
c. Connect the Electrical Wires
Strip the ends of the electrical wires as needed. Connect the wires from the ceiling to the track following the electrical diagram provided with your Dimmable LED Track Light product. For Polaris Track Lights and Flame Track Lights, proper connection ensures stable power supply and smooth dimming functionality. After connecting, use electrical tape to insulate the connections.
d. Install the Track Light Fixtures
Finally, install the Dimmable Track Lights onto the track. For our Polaris Track Lights and Flame Track Lights, simply slide them onto the track and adjust their positions as desired. Once installed, turn the power back on and test the lights to ensure they are working properly.
3. Features of IMIGY Lighting’s Products in Installation
Our Polaris Track Lights are designed with installation convenience in mind. The track and fixture structure is simple and intuitive, making it easy to follow the Install Track Lighting Ceiling steps. Even for those with little installation experience, they can quickly complete the installation process, and the stable structure ensures long - term reliable operation after installation.
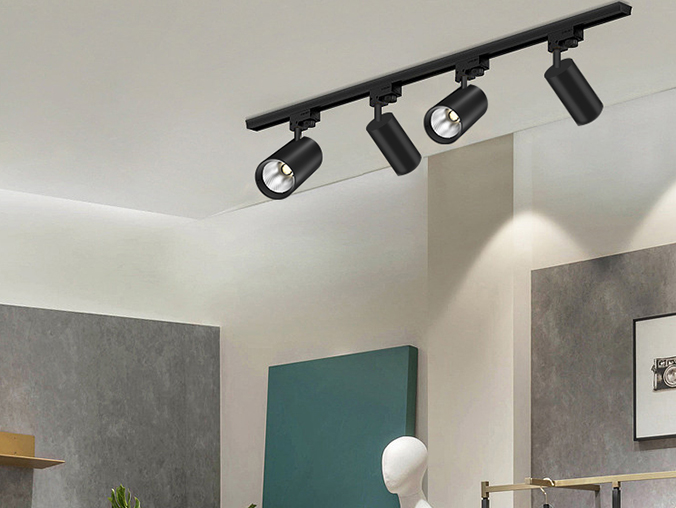
Flame Track Lights also offer user - friendly installation features. The lightweight design reduces the difficulty of installation on the ceiling. Their compatibility with standard electrical connections simplifies the wiring process, ensuring that when combined with the Install Track Lighting Ceiling steps, users can enjoy a hassle - free installation experience and start using these high - performance Dimmable LED Track Light products in no time.

4. Why Choose IMIGY Lighting?
a. Installation - Friendly Design
We focus on creating Dimmable Track Lights with installation - friendly designs. Both Polaris Track Lights and Flame Track Lights are designed to be easily installed following the Install Track Lighting Ceiling guide, saving you time and effort during the installation process.
b. High - Quality Assurance
All our products, including Polaris Track Lights and Flame Track Lights, undergo strict quality control. From the materials of the track to the components of the fixtures, every part is carefully selected and tested. This ensures that after installation, our Dimmable LED Track Light and Lampu Track Light products can provide stable and long - lasting lighting performance.
c. Comprehensive Service Support
Our professional team provides comprehensive service support. If you encounter any problems during the Install Track Lighting Ceiling process, whether it's about tool usage or installation steps, we offer pre - sales consultation, installation guidance, and after - sales technical support to ensure a smooth installation experience.
Properly Install Track Lighting Ceiling is the key to enjoying the excellent lighting effects of Dimmable Track Lights. With the step - by - step guide and tool list provided above, along with the user - friendly installation features of IMIGY Lighting’s Polaris Track Lights and Flame Track Lights, you can complete the installation with confidence. Whether you are upgrading your home lighting or enhancing the display in a commercial space, choosing IMIGY Lighting means choosing reliable products and a worry - free installation process. Let our high - quality track lights light up your space and bring a new look to your environment.
It is recommended that you upgrade the latest browser
 Edge
Edge


